If you’ve ever considered taking on a woodworking project, you probably have a good idea that sanding is involved. However, even experienced woodworkers may have some questions about sanding. After all, there are different sanding techniques and different sanding tools to produce different results.
So, how should wood look after sanding? Once the wood has been sanded, it should have an even surface with non-jagged or rough edges, it will take on a lighter color appearance, and often the grains of the wood will show more. Sanded wood should be mostly free of blemishes, scratches and uneven surfaces.
We’ve compiled a full guide for you on how wood should look after sanding with photo examples and descriptions, but it doesn’t stop there! We’ve also compiled all the information you need to know about sanding tools, techniques, and tips for sanding wood for the best results.
How Wood Should Look After Sanding
How wood should look after sanding depends on a few different factors, like the grit of the sandpaper used or the type of sanding machine used. It can also depend on the type of result you’re looking for. Before giving you examples of what wood should look like after sanding, let’s take a look at why sanding is important and give you a quick look at the different sanding tools and techniques.
Why Sanding Wood is Important
When starting or working on a project with woodwork, doing the correct prep work and building a good foundation is the key to great end results. Sanding is one part of prepping woodwork and building a good foundation for woodwork projects.
Sanding wood removes flaws in wood, like dents, gauges or mill marks. It allows the wood to have a much smoother surface, which is important for other steps in woodworking, like priming, staining and painting. Sanding can also help remove old paints or colors left on woodwork.
When working with wood, sanding is important to ensure a good end result!
Different Types of Sanding Tools
Having knowledge of the different types of sanding tools can help you understand what a piece of woodwork should look like when it’s sanded. There are a few different types of sanding tools, mainly consisting of good ole’ sandpaper and sanding power tools. Let’s take a look at what they are and what they do.
Sandpaper
Chances are you probably already know what sandpaper is, and you probably already know that sandpaper can be used for sanding wood. But did you know there are different types of sandpaper? Different types of sandpaper are called grits.
The grit of sandpaper is based on the number of sand granules per square inch of sandpaper. When it comes to sandpaper, the higher the grit means the finer the grade. Lower numbered grades are coarser sandpapers. So, a high grit equals a fine sandpaper, where a low grit equals a coarse sandpaper.
Different grits of sandpaper clearly lead to different results. They are also used for different types of woodwork. Here’s a look at what the different grits of sandpaper are used for:
| Fine Grit Sandpaper | Used for a final light sanding before applying stains |
| Medium Grit Sandpaper | Used for removing scratches or old finishes; used for antique and furniture refinishing; used for some final shaping of wood |
| Coarse Grit Sandpaper | Used for rough shaping of wood and removing tough old finishes |
| Extra Coarse Grit Sandpaper | Used only for the toughest jobs and hardest to remove finishes; sometimes used on old wood floors |
Sanding Power Tools
Classic sandpaper is always reliable, but today we have the option of using sanding power tools for projects as well. There are two common main types: random orbital sanders and belt sanders.
Random Orbital Sanders
Random orbital sanders have a round pad that vibrates in “random orbits,” or circles. They can be used for both stock removal and for ultra-smooth sanding projects. Random orbital sanders don’t sand as quickly as belt sanders, but they’re great for beginners, versatile, and sturdy.
Belt Sanders
Belt sanders are perfect for smoothing large, flat surfaces, and are also great for sanding very rough surfaces. This sander works by continuously looping sanding belts to sand down the wood.
Belt sanders are also useful for removing old finishes. They’re fairly versatile and come in different sizes, but they can be large and hard to control. Those who are beginner sanders may want to put in some practice with belt sanders before using them on projects.
How Wood Should Look Once It’s Sanded: Before and After
Drum roll… it’s the section you’ve all been waiting for! When wood has been sanded, it should have an overall smooth appearance, with no grooves, dents, or sharp jagged edges. Wood that’s been sanded will also tend to be a lighter color in appearance, and the grains of the wood tends to show much more.
If the wood has been sanded with a higher grit sandpaper, it will show the grain of the wood more. If it has been sanded with a lower grade sandpaper, the grains of the wood will show a little less. The higher grit sandpaper allows for creating more specific lines and shapes, as well as more detail.
Let’s take a look at some before and afters of wood that has been sanded.
Pieces of Lumber Before and After Sanding
Below, Megan Harney at Our Handcrafted Life shows an awesome example of wood that has been sanded with different grits of sandpaper, versus wood that hasn’t been sanded at all.
Notice that the wood that hasn’t been sanded has some rough, jagged edges and an uneven surface. There are some dents on the side of the wood as well.
Using a 120 grit sandpaper allowed for a lighter color in the wood, a very smooth surface, and precise corners and edges.
220 grit sandpaper produced much of the same results as the 120 grit sandpaper, with a bit more of the grain showing through the wood.
320 grit sandpaper allowed for a lighter appearance in the wood with much more pronounced grains in the wood. The surface is still smooth, but the edges and corners aren’t as sharp as the 120 and 220 grit sanded wood.

“Our Handcrafted Life” suggests using a 320 grit sandpaper if you plan on your piece being very smooth with a clear glass or glossy finish. If you wish to use a stain on your wood after sanding, 220 grit sandpaper is your best bet. If you plan on just painting your wood, you can stop at a 120 grit sandpaper.
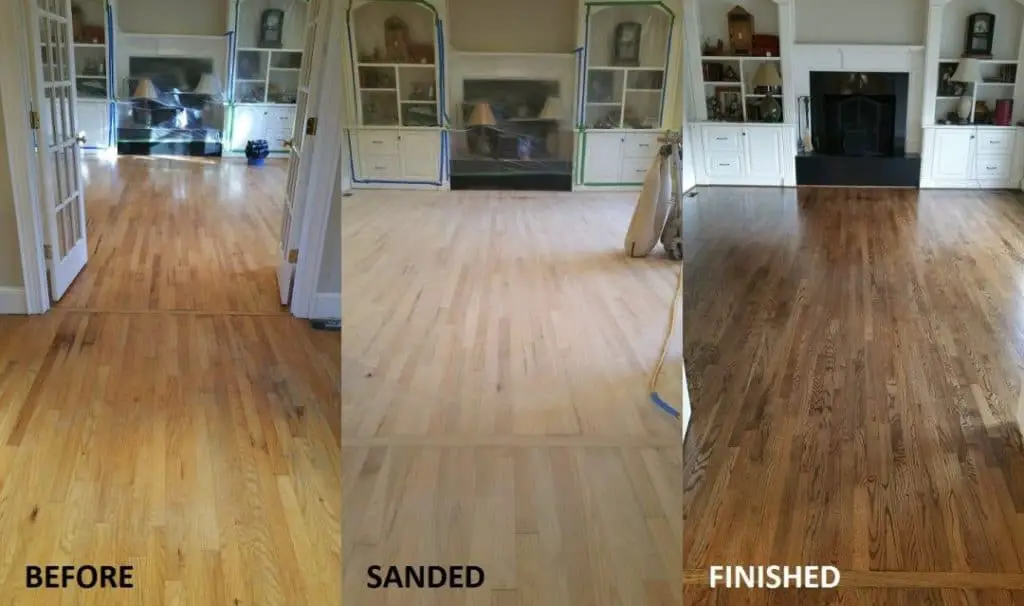
Wood Floors Before and After Sanding
Our next example is of a hardwood floor refinishing project by Mr. Wesinton at NewGen Restores. In this photo, you can actually see the floors before they were sanded, after they were sanded, and after they were stained and finished.
This photo really brings home the fact that sanding is very important for achieving a great end result look!
Notice the wood in the “Before” photo has some large color contrasts, a few dents, some scratches, and some other color disfiguration. Once the wood floors were sanded, the wood took on a much lighter color; the color of the floor was also less contrasted and more even.
The sanded wood floors were also a much more even surface without dents, scratches or color dis-figuration. You can see once the wood was stained and finished it kept its even, non dented and non scratched surface, but with a darker and more even color appearance.
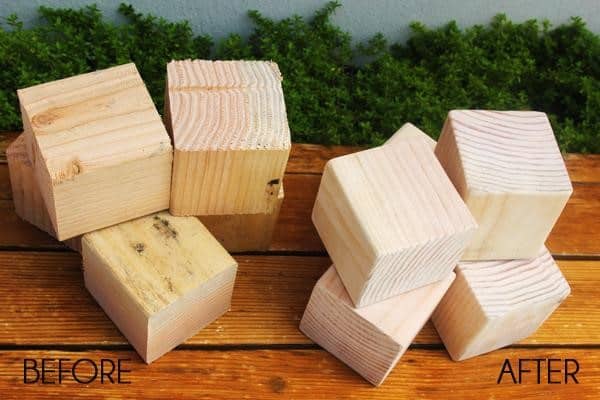
Another Sanding Before and After
The photo below shows a basic sanding project of some wooden cubes. Although this sanding project is relatively simple, it shows good detail of how wood should look once it’s been sanded.
Check out the blocks before they were sanded; much like the first before and after photo, the blocks had jagged, rough edges before being sanded. They also had some color contrast as well as some dents and blemishes.
Sanding the wood blocks again resulted in a lighter color of the wood, an even surface on all sides, non-jagged or rough edges, and sharp detail. The grain of the wood also looks like it is coming through more visibly.
Tips for Sanding Woodwork to Get the Best Results
Now that you know how wood should look after sanding, you can take on some tips for making sure your woodwork gets the best sanding results. Let’s take a look at some of them.
Tip #1: Buy Quality Materials
As with most (if not all) projects, buying quality materials is important. Since sanding wood is the start to a good foundation of your woodwork, you’ll want to buy quality materials for the best results. Construction-grade tools from lumber and hardware stores are your friend here!
Tip #2: Always Sand With the Grain
We’ve talked about grain a lot in this article. The grain is the pores in the surface of the wood that form patterns. Always sand your woodwork in the direction of the grain – never against it or perpendicular to it! Not doing so can produce scratches and uneven surfaces.
Tip #3: Always Remove Dust After Sanding
Once you’re done sanding your woodwork, there may be some residue left over. This is usually a dust-like material. Before doing anything else with your woodwork, rub a tack cloth over the entire surface of the wood to remove the dust and residue.