A lot of people use the term countersinking when they are drilling pilot holes. Knowing when to countersink and the proper way to use this screw driving method can be very helpful.
So, what is countersinking? Countersinking is the process of drilling out a conical, or V-shaped, area at the top of a pilot hole for the screw head, which is also V-shaped. The screw head can either be flush or below the surface of the material it’s being drilled into, depending on the application.
There are certain reasons why you’d want to use countersinking when using screws or bolts. I’ll explain these and some other tips and tricks below, so keep reading!
When to Use Countersinking and Why
The main reason you would want to countersink a screw is to have the screw head below the surface of the wood. I know what you’re thinking…You can achieve this by just drilling a pilot hole and screwing in your screw until it goes below the surface. While this may be true, it often splinters or bubbles the surrounding area of the screw head, leaving you with a rough finish that you’re going to have to sand a little bit.
You can also use countersinking to drill your screw to a deep enough depth where you can fit a nice clean wood plug over it, giving a professional touch to your project. If you’re using a wood plug, make sure to align the plug’s wood grain in the same direction as your project. It’s a nice touch!
Also, pilot holes and countersinking can be very helpful when working with any type of hardwood. Sometimes, if the wood is hard enough, it will actually crack or split if you try to drive a screw into it without properly drilling and countersinking the head of the screw.
Pre-drilling and making pilot holes also make it much easier to drill a screw into your wood. This alone reduces the chances of mistakes when drilling your screw. I’ve skipped this important step a lot of times, and I frequently slip off the screw with my drill, or drill the screw in at the wrong angle. I’ve learned the hard way far too often, and now I almost always drill a pilot hole and countersink all of my screws.
What is Counterboring, When to Use and Why
Counterboring is the process of drilling out a wide, flat area of a pilot hole, so there is space for the fastener (Screw or bolt), washers, and socket wrench to get into. The flat bottom hole matches the washer and fastener. If you have countersunk your hole, instead of counterboring it, the V-shaped hole would bend the washer when you tighten the screw or bolt.
Similarly to countersinking, if you counterbore your fastener deep enough, you can also use a plug to fill in your material. One thing to consider is whether or not you are going to need access to your fastener; let’s say a bolt. You wouldn’t want to counterbore your bolt and seal it with a plug if you are going to have to take the bolt apart for any reason.
Trying to get plugs out of materials can be challenging and time-consuming. Think ahead before deciding on how deep to counterbore your hole.
Different Types of Countersink Drill Bits
There are a bunch of different types of drill bits that you can use to countersink your screws. When choosing your countersink drill bit, you also want to make sure that the angle of your drill bit matches the type of screw or fastener that you’re going to use. If it doesn’t match properly, you’ll actually lose a little strength in the connection between the screw and the material.
The most common screw angles are 82° and 90° in the United States. Other countersinking degrees are 60°, 100°, 110°, and 120°. If you’re countersinking metal or hardwood, the degree angle is more important than if you were just drilling into soft wood because the head of the screw will not sit properly in the countersunk hole.
Here’s a list of the most common countersink drill bits.
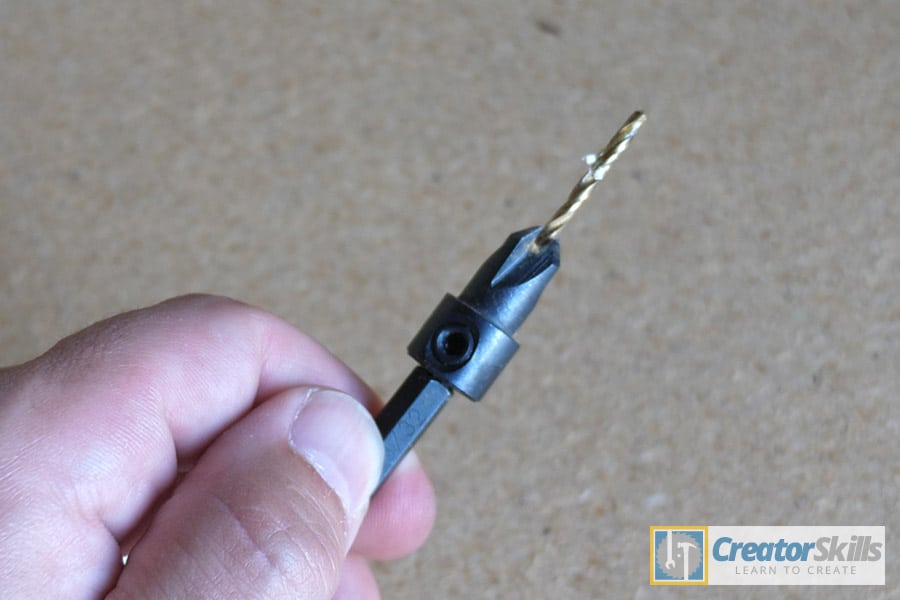
- Countersink and Drill Bit Combo – I’ll start with this because it’s what I use most of the time. The combo bit is exactly what you think it is…two drill bits in one! The countersink bit portion of the drill bit creates the V-shaped cutout for the screw head, and the actual drill bit portion drills the pilot hole. Having both bits in one saves time because you don’t have to drill the pilot hole, change to your countersink bit, drill your countersinking hole, and switch back to the pilot hole drill bit.
- Single Fluted Countersink Bit – This countersink bit has one cutting edge and one flute to remove waste material. You would still want to drill a pilot hole first with a regular drill bit.
- Multi-Fluted Countersink Bit – A countersink drill bit with more than one flute. The added flutes in comparison to the single fluted countersink bit make it more efficient at cutting and removing waste. Again, like the single fluted version of the bit, you’d want to drill a pilot hole still.
- Zero Fluted Countersink and Deburring Combo – This bit is usually used for metal, and the deburring feature helps by removing the sharp burrs that are left after drilling a hole. Make sure to use it after your pilot hole is drilled in the metal.
- Drywall Screw Setter Bit – This is used for driving drywall screws to the proper depth, giving you the perfect countersink. I’ll go into more detail below.
Also, if you’re looking to get your hands on a countersinking bit and plan on using wood plugs to cover your countersunk screws, there are awesome combo packs that have the countersinking bits along with the properly sized plug cutting bits. Make sure to look for those while you’re shopping to make your life easier!
How to Set Countersink Depth
Getting a consistent depth on your countersunk holes can be a little tricky if you don’t have access to a drill press. Drill presses usually have a handy depth stop on the side, allowing you to drill perfectly every time.
If you’re using a standard hand drill, setting the perfect countersinking depth can be just as easy as a drill press, as long as you know the right trick… The normal ways of setting the countersinking depth have downsides. Common ways to set the depth and their downsides are:
| Method | Downside |
| Marking your drill bit with a marker | You have to leave a permanent mark on your drill bit. Have to try and see it while it spins at incredibly high speeds through sawdust or metal. |
| Marking your drill bit with tape | I don’t want tape goo on my drill bit. Tape slides up on heavy use and decreases accuracy. |
| Use a stop collar on your drill bit | They spin with drill bit, leaving marks on the surface of the material. |
Luckily, you can easily make a depth stop out of scrap wood to set your countersinking depth perfectly every time. Just follow these simple steps.
- Find a small piece of scrap wood to use as your countersinking block.
- Drill a hole the size of your drill bit shank (Not countersinking size) through the block.
- Drill a second hole halfway through your wood block that is the size of your countersinking bit.
- Test the depth of the countersink and trim the wood block as needed until you get your desired thickness.
The square or rectangular shape of your block makes it easy to hold on to, so it won’t spin and leave marks on your material.
How to Countersink Drywall Screws
When hanging drywall, you want to countersink your screws just below the paper part of the drywall. If you don’t drill your screw deep enough, you’re going to have a challenging time mudding your screw because you’re going to have to add a lot of drywall compound to the surrounding area.
Then, you’re going to have to sand and feather the big bump you just created to make it not as noticeable. This is an amateur mistake that kills productivity, efficiency, and worst of all, makes your drywall look bad.
Mudding drywall is much easier when all of the screws are countersunk, and sitting just below the surface. You’ll know when this is done correctly because it will feel tight, and not pop through the paper and keep going.
If you are hanging a lot of drywall, you might want to consider picking up a dedicated drywall screwdriver. These are basically drills with a collar around the outside of the screwdriver bit. It hits the drywall at a certain point (Which you can adjust to your liking) and stops you from driving the screw in too far. They work really well, and I highly recommend checking them out because they are made specifically for perfectly countersinking drywall screws, and do a great job.
The poor man’s way to countersink drywall screws is to use a standard electric screwdriver and drive the screw until the head of the screw barely touches the drywall. Then you want to give the screw just a little bit extra rotation, using tiny increments, so it sits just below the paper, and not too deep where it won’t hold the drywall properly.
There are also a few different types of drywall screw setter bits that you can use instead of the standard screwdriver bit in your drill. These work pretty well, and they are pretty cheap. If you are looking to buy one of these, I have two tips for you.
- Tip #1 – Make sure you don’t get a screw setter bit that is too wide. If your bit is too wide, it makes it hard to countersink screws on drywall joints, where you have to drill on an angle.
- Tip #2 – Look for drywall screw setter bits that are magnetized. Having your screw held perfectly onto your drill bit is a nice feature to have that makes the job easier and saves some time.
How to Countersink Metal
First off, make sure you need to use a countersinking bit and not a counterboring bit before you start drilling into your project. If you just skipped ahead to the section, I explain more in the counterboring section above, so check it out if you haven’t already.
For countersinking fasteners into metal, I like to use a three-step process. The last step is optional. I also like to use some type of oil to reduce heat and friction between the metal and the drill bit. Tap Magic Cutting Fluid is the specific type I’ll use, but if I run out, I’ll just use WD-40.
- First, I’ll drill the actual pilot hole with a black oxide or cobalt steel drill bit. Any high-speed steel (HSS) drill bit usually will work, though. HSS tends to get dull and wear out a lot faster on metal because it’s not as soft as wood. I’ll stop every so often and add a little oil.
- Next, I’ll switch bits to the countersink and deburring combo bit, add a little more oil on the surface around the hole, and drill my countersinking hole to the correct depth. I like to double check the depth by placing the screw or fastener in the countersunk hole and making sure it’s where I need it to be.
- The third step is optional. If the pilot hole in the metal goes all the way through the entire piece of metal, I like to flip over the metal and give a slight countersink and deburr to the other side. This helps to by removing anything that was left over from drilling the first hole in the metal.
Countersinking Conclusion
Countersinking is pretty simple to do and really improves the look of your projects. I hope I answered all of your questions about countersinking along with any other problem that might have popped into your head while reading. If not, ask away in the comments section below…I’m here to help!